Page 1 of 10
The Restoration of AYW709
Posted: Mon Mar 10, 2008 10:18 pm
by mikeyr
AYW709 is my 1934 Singer Le Mans, here will go daily details when I work on it.
Warning, I don't work on it daily
 *** Can you believe it, I started this thread in 2008 and here it is 2021 ? OK, back to work on my car, so I moved this from "Mike's Forum" up to "Pre-War" where it belongs, that shows commitment right ? (I hope so). Most of the regulars have seen this thread but it died, I am resurrecting it and will add to the bottom.
Re: The Restoration of AYW709
Posted: Wed Apr 02, 2008 10:14 pm
by mikeyr
My Le Mans has been in a state of "hold" for several years now, in reality I did work on it but I worked on components and I did do the important thing, I spent money on it but it showed very little to no progress when you looked at the car.
The motor went in almost 2 years ago and it is still crooked in the frame since I never have finalized the new motor mounts. With the recent death in my family and with the fact that I have to move in 4-9months depending on how fast the legal system moves, I thought I would work on my car. After the move I will be busy remodeling the house and won't have time to work on the car so I have a few months of car work
I thought it was time to get the motor in straight! The problem is that the distributor is on the side of this motor and directly in front of the steering column, so if you place it wrong you can't get the distributor cap off to set/change the points and the plug wires get bent also. This means removing the steering column everytime you want to tune it up, absolutely unacceptable. The only way to get it correct is to put the body on, so 8 years after the body came off, I put it back on. Its in worse shape than I remember and it caused me to change my tactic on this restoration. I am going to stop doing mechanical work on the car and rebuild/redo the body now instead of later, I will also build up the car and put the fenders/wings back on, they are brand new and will need fitting along with the new grill shell. Think of it as a "mock-up" of the car, after its all built up, I will take it back apart and clean up all the paint I damaged on the chassis and do the final body work and paint and then the reassembly will be super easy since I know it all fit perfectly.
I will do the motor part now since some of this is based on the motor location. One thing I noticed is that the motor is awfully close to the wooden firewall and since I have no floor or firewall and I have no idea what it should look like, I will be making a real firewall from sheet metal. I think it will look better in the long run and like I said, I don't know what it should look like anyway. This is all minor and still within my rules of "Do No Harm" to the car, it will be very easily restorable to original by my heirs many decades away from now.
Remember you can click on the pictures to see the larger version.
 Viewed 227081 times")
- The way it has looked for a while now, just a few parts added on over the years.
 Viewed 227084 times")
- Yes, I know the motor is crooked that is the point of this, to get it in the place.
This pretty much shows the car as its been for several years, just sitting there waiting for more time from me. Now it has it
 Viewed 227079 times")
- Those brake drums sure look GOOD
 Viewed 227083 times")
- I notice I have to get those little brass sleeves in the leaf springs but otherwise the suspension is finished.
That pretty much shows it all, now onto this weekends work.
 Viewed 227086 times")
- On the ground on her very own 4 wheels with her body on, looking like progress
 Viewed 227088 times")
- Think I can polish that out ?
Now for some problems, one is the body hits the frame, this has not changed since I took it apart 8 years ago but it also keeps the last bracket from touching the frame, originally when I took it apart that bracket had a half-dozen or so thick washers, I have to figure out the problem and fix it.
Re: The Restoration of AYW709
Posted: Mon Apr 14, 2008 6:53 pm
by mikeyr
Re: The Restoration of AYW709
Posted: Wed Apr 23, 2008 7:06 pm
by mikeyr
Not a lot of work this weekend, I actually moved my LM back into storage for a few days/weeks while I work on my 4AD, have to get it all shiny and sell it.
But I think I am going to make a commitment here, my LM is a 1934 car first sold in March 1934 (I don't have the actual date) that means next year the car will be 75 years old. I am going to make a commitment here and make sure the car is on the road for its 75th birthday I think that is good one to make, its going to be near impossible since I have a garage to build and a house to remodel and then move into the new house but I am going to try and fill that commitment above.
(you can read that right ?, no ? oh I am sorry, just trust me when I say I succeeded on my commitment in that case.)
Re: The Restoration of AYW709
Posted: Fri Jun 20, 2008 10:15 pm
by mikeyr
The 4AD is gone and the Le Mans is back in the garage, we are moving to a new house soon but I have a month to work on the car, look out termites ! its time to replace some wood.
Re: The Restoration of AYW709
Posted: Tue Feb 09, 2010 4:31 pm
by mikeyr
Poor little Le Mans is out in the rain and its pretty heavy rain too

I had to put her outside because the drywall guy is finishing the garage and wanted the freedom of a empty floor, it was beautiful and sunny over the weekend with no rain predicted and its pouring down on my poor little car.
Thank goodness its a British car, they are not afraid of the rain and she won't melt.
Re: The Restoration of AYW709
Posted: Mon Oct 11, 2010 8:05 pm
by mikeyr
awful lot of nails and screws hold that Aluminum skin on the wood frame. Wow, I thought maybe 1 hour to remove all of them, I was at it 3 hour and don't have half of them out yet, but in my own defense I also found wood screws in the sheet metal that were bondo'ed over, doubt they were original.
The wood is in really bad shape, but here we go!!! pics soon.
Re: The Restoration of AYW709
Posted: Mon Oct 18, 2010 4:53 am
by mikeyr
well the wood is is MUCH worse shape than I thought, many pieces are broken and most are rotted, there is enough for a pattern.
I have now figured out how Singer never made any money selling these cars, they spent their entire budget on nails to hold the body on, the number of nails was crazy !
Re: The Restoration of AYW709
Posted: Fri Sep 11, 2015 6:24 pm
by mikeyr
Well I have re-started the body wood work. This is my second attempt at it, my first attempt created some really nice Ash firewood, quite a few hundred dollars worth of firewood. I decided to buy a body from the UK and everything was moving forward and now the UK has gone silent, no replies to my e-mails so back into the firewood making business I go, hopefully less firewood and more body this time.
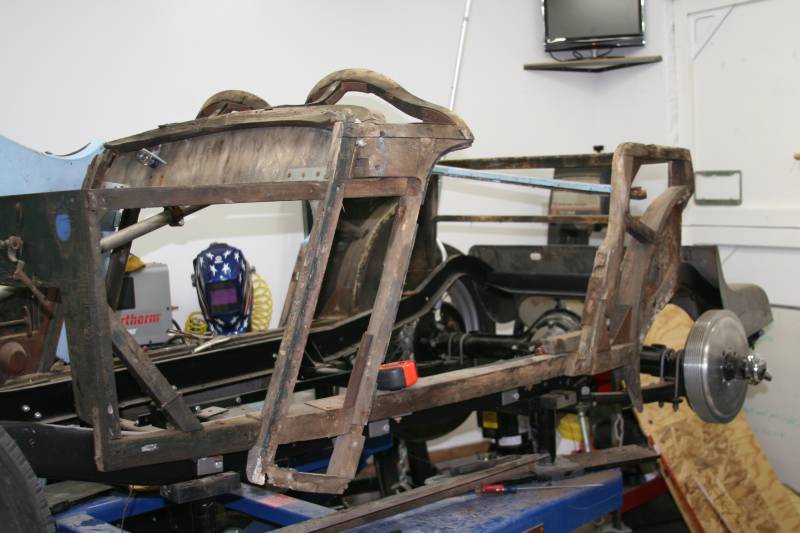
First things first, re-do the template I made last time for the wheel well, I had a completely wrong curvature because I traced my originals which are in 6 or 7 pieces with rotted sections missing...DUH I am a idiot sometimes, why not follow the aluminium body section instead, so that was last weekends project. Then I have to figure out the long part or many parts that make up the long part from the rear wheel well to the cowl under the door, I have no wood to work out a pattern from and the sheet metal on both sides it pretty dinged up and damaged, so can't use that for a pattern either. I know its a compound curve but that is all I know. In pictures in the gallery on this website, it appears to be one piece of wood.
If I can get the wheel well and that piece under the door, I have enough for a pattern on the rest of the pieces. Does not mean it will be easy though and I am dreading the doors since they have to fit perfect. Pics on the way soon.
Re: The Restoration of AYW709
Posted: Mon Sep 14, 2015 5:01 pm
by mikeyr
Well I spent the weekend in the garage, laminated a new rear wheel well and this time I think I got the curvature right. Fitted some pieces together and I am "ok" with the initial fit, now its time to get serious and cut the wheel well to size...wish I knew the size to cut it to. I will get some pics posted so maybe someone can help with how far below the body does the wheel well go, I think it does not go below the aluminum body at all, but the way my old butchered rear fenders were made it had to and there was fibreglass down there to hold onto the rear fenders.
Re: The Restoration of AYW709
Posted: Tue Sep 15, 2015 12:55 am
by mikeyr
Ok so it really does not go below the aluminum sheet metal. After all the work I cut the dammed wheel well 3/4 " too short.

Oh well good practice
Pretty happy with the start
Re: The Restoration of AYW709
Posted: Wed Sep 23, 2015 6:15 pm
by ColinB
That looks pretty good Mike. The second one will be perfect!
Re: The Restoration of AYW709
Posted: Thu Mar 17, 2016 12:27 pm
by ColinB
Any progress Mike?
Re: The Restoration of AYW709
Posted: Fri Mar 18, 2016 3:56 pm
by mikeyr
Not really, more like backwards progress since my daughters husband (husband in a week, right now just fiancé) purchased a 1960 Mini Cooper and I am working on that lately, trying to get it out of my garage.
BUT once that is done and it will be very soon, I have promised my family, no more cars until the Singer is done ! So there will be progress mostly because of you Colin, I keep seeing all the work and how fast you are getting your car done along with Peter who is doing the same and I want mine finished.
Re: The Restoration of AYW709
Posted: Thu Oct 08, 2020 2:29 pm
by ColinB
Shift that Mini out of the way and get back on this classy old girl Mike.
