Page 11 of 18
Re: Hello
Posted: Thu Nov 17, 2016 7:12 pm
by Phillip
Hey Colin,
I can tell you that the front quarterlights, rear side windows and headlight glasses on my 1928 Senior were held in place by some very old material that looked like glazing putty! Colin Borley would most likely be the 'man in the know' to advise for sure.
Hope that helps!
Amazing restoration by-the-way! It's coming along really well!
Cheers,
Phillip
Re: Hello
Posted: Thu Nov 17, 2016 9:49 pm
by ColinB
Thanks Phillip. That sounds very plausible as whatever material is used it has to provide some level of 'stick' to keep the glass in place. This will be even more important for the upper screen as that seems to have no lower frame so the glass can potentially slide out unless it is firmly held in position.
regards
Colin
Re: Hello
Posted: Fri Nov 18, 2016 1:41 pm
by ColinB
Perspex cut but I'm leaving the protective film on it until the risk of scratches has reduced. I have heard from a Singer Owner's Club member that a mastic type material is used when he gets his screens professionally fitted so I'll use black bathroom sealant for mine. I suspect I'll have to do some careful masking to keep everything looking tidy.
Re: Hello
Posted: Fri Nov 18, 2016 3:51 pm
by Phillip
Looking good Colin!
I'm pretty sure that a putty type mastic was used originally for all glazing on these early cars and silicone is probably the modern alternative. Since the old-style glazing mastic has oil in it, it is difficult to get here now, although there are 'green alternatives'.
She's really coming together now!
If I find some time I may post my adventures with the Senior as I work through the mechanicals. The engine was a mess!
Re: Hello
Posted: Fri Nov 18, 2016 6:49 pm
by ColinB
I would love to see some pictures Phillip.
Both parts of my screen cut. I think I will mastic the lower screen into position first and then do the top one (which has a bit of wiggle room) in place above the lower one. I'll probably put some very thin paper between them as a spacer so it all opens easily when it has set.
Re: Hello
Posted: Tue Nov 22, 2016 8:51 pm
by ColinB
I seem to have solved my starting problem. I took the choke mushroom off and noticed that the inside of the carburettor was wet with fuel but nothing was getting to the engine. I used my hand as a choke and pushed the throttle open with one finger and just turned the engine slowly through one compression with the other hand. It kicked back and almost took my thumb off! I have adjusted the choke so it closes properly and when I put a battery on the starter motor tonight she fired up straight away and ran beautifully until I turned her off.

Re: Hello
Posted: Tue Nov 22, 2016 9:45 pm
by mikeyr
Awesome, pretty soon you will have to do the same with my car here in Calif.
Warning we have lots of body (wood) work to do first

I am not going to be working on my car for a while...Paris is calling me for the holidays and I always answer when Paris calls.
Re: Hello
Posted: Tue Nov 22, 2016 9:51 pm
by Phillip
Heeyy!!! Amazing!
"it's alive!!! It's ALIVE!!!!"
Congrats Colin!
Re: Hello
Posted: Fri Nov 25, 2016 6:32 am
by ColinB
Old cars always surprise you: I changed the oil and the oil pressure has gone through the roof. It was around 3 lb on the gauge before I changed it and has gone up to 9 lb with nothing else having been altered. I think there is a pressure relief valve somewhere in the system which may have stuck. Plenty of oil reaching the rockers so oil is obviously circulating. I'll drop Dick Preston a note to see what he thinks but I'd be glad of any other thoughts.
Re: Hello
Posted: Sat Nov 26, 2016 9:49 pm
by ColinB
I just heard back from Mike Hyman's aunty (ASCO) who tells me it's great to have a good high oil pressure in a 1929 engine so I shouldn't worry. Mike knows what he is talking about so I will follow his advice...!
Re: Hello
Posted: Tue Nov 29, 2016 7:44 am
by ColinB
A nice eBay find - an original Solex handbook with their pre-1934 address so probably the same as would have been supplied in 1929.
For some reason my iPad refuses to put the pictures the right way up but you will get the impression even if they are upside down!
Re: Hello
Posted: Thu Dec 01, 2016 9:26 am
by ColinB
Lower screen in position and black sealant applied. I have put the rubber waterproofing strip along the top and just need to give the Perspex a good clean with WD40 to take off the remains of the glue from the protective film.
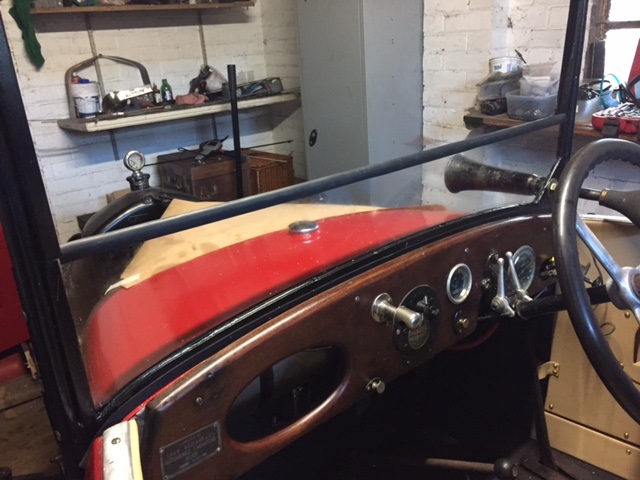
- Lower screen 1.jpg (101.62 KiB) Viewed 3084 times
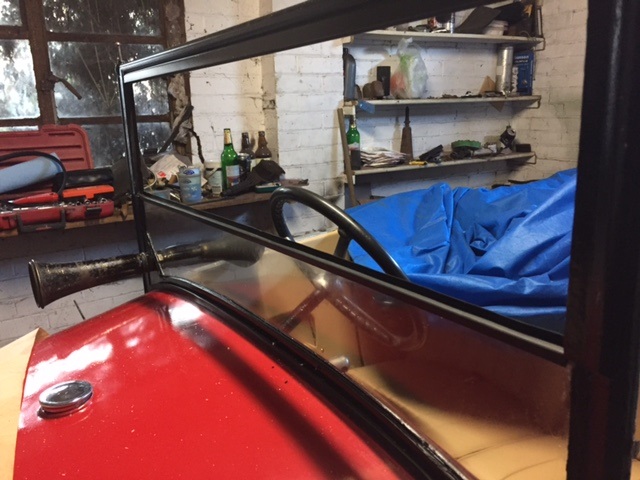
- lower screen 2.jpg (106.27 KiB) Viewed 3084 times
Re: Hello
Posted: Fri Dec 02, 2016 8:01 pm
by ColinB
Re: Hello
Posted: Thu Dec 08, 2016 5:44 pm
by ColinB
I have a wiring question. Obviously the feed to the lights comes from the dash switchboard to a junction box and from there the power is distributed to the side/rear and headlights. Is this junction box mounted on the bulkhead? It seems logical as it will be above most of the spray on a wet day, but I am open to correction.
Re: Hello
Posted: Mon Dec 12, 2016 10:31 am
by ColinB
Now she starts quite easily I reversed her out of the garage under her own power. I think she looks quite nice in the daylight although the camera is very kind and improves the quality of finish I have actually achieved. (And yes the bonnet is a little darker than the rest too). I plan to call it patina!
Wiring under way but I'm waiting for some materials to arrive. I bought two-strand wire on eBay without looking at it too hard and when it arrived I saw that it was only 0.75mm wire which is not enough for 6v. I have some 1.5mm wire on its way. I have also bought the corrugated aluminium for the running boards which may go on this week. The final major job will be to see it I can salvage the radiator surround.
I will send William the picture as a Christmas Card as he has remained very interested in progress since he sold me this little car that had sat quietly in his shed for around 55 years.